| Stanley Dock to Litherland |
|
|||||||
| Stanley Dock to Litherland |
|
|||||||
Home Page: merseyWalks  |
Home Page: allertonOak  |
|||
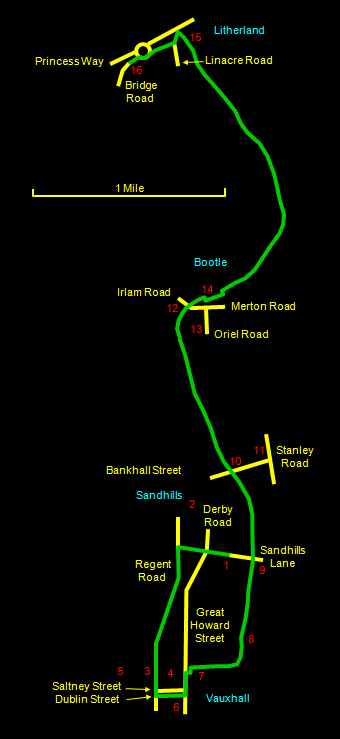
This walk of 5½ miles (9 km) will probably only appeal to those with an interest in Liverpool's industrial heritage, although the area around the locks on the Leeds and Liverpool Canal is quite pretty in its way. It begins with a look at the vast warehouses and atmospheric disused docks around the Stanley Dock Conservation Area. It then proceeds along the canal tow path to Litherland. It is designed to begin at Sandhills station and end at Seaforth and Litherland station for the short train ride back to Sandhills. For those who do not want to do the entire walk, it is possible to do a short walk back to Sandhills (2 miles, 3 km) or get the train back at Bankhall (3 miles, 5 km) or Bootle Oriel Road (4 miles, 6½ km) stations. The way is entirely firm under foot, so any comfortable footwear will do. The relevant Ordnance Survey 1:25000 Explorer map is No. 275. For further information on the locations visited, click on the images.
|
||||||
 |
| CLICK ON THE IMAGES FOR MORE INFORMATION |
</em>") |
Turn left out of Sandhills station [1] and walk down Sandhills Lane (don't let the name raise your hopes; it's a long time since this jaded industrial area saw any natural landscape!). Go carefully straight across busy Derby Road at the traffic lights, noting the rather graceful parabolic Tate and Lyle sugar silo [2] over on the right. At the bottom, turn left onto Regent Road, usually known as the Dock Road. |
|||
Cross over to the right hand side for a close look at the massive Dock Wall with its intricate stone construction and periodic dock gates with their castellated gatepiers. Pause at the old lift bridge [3] to take in the atmosphere. Looking inland, Stanley Dock [4] is in front of you, with Hartley's warehouse and fanciful pumphouse to the left and the stupefyingly vast Tobacco Bonded Warehouse to the right. Turning towards the river, there is a fine view over Collingwood and Salisbury docks to the Victoria Tower [5]. |
||||
Walk on to the other corner of the Tobacco Warehouse to peer down the evocatively nicknamed Pneumonia Alley. Cross Saltney Street and turn left at Dublin Street (neither of these seem to be named at street level). Walk up to Great Howard Street and cross carefully over. Here you get a good view of the rear of the Tobacco Warehouse with the furnace chimney known as the King's Pipe, where tobacco waste used to be burnt. To the south is another massive warehouse, the Bonded Tea Warehouse [6]. This group of buildings is the last significant remnant of what was once the characteristic landscape of the dock hinterland. |
||||
Walk north along Great Howard Street and look for a gap in the wall on the right just past the Tobacco Warehouse. Turn in here to reach the ascending series of locks [7] (image on the right) at the end of the Leeds and Liverpool Canal. Cross the narrow footbridge to a grassy area, where you can sit down and take in the scene; it's pleasant spot. Walk up the canalside and follow it where it bends to the left. Note the blue Boundary Bridge of 1836 [8]. If you've had enough of the canal, you can leave at the next bridge but one [9] (Sandhills Lane) to return to the station. |
|
||
When I was a kid in the 1950s (I was born in Litherland), the next stretch of the canal up to Litherland was derelict, polluted and smelly. To be honest, many parts of the district to either side of the canal are still not pretty, but in other parts there are smart waterside houses and apartments. The canal is clean, the air is good and you will see many swans and other water birds, along with the occasional pleasure craft. It's a good brisk walk to Litherland, but, if you must, you can exit earlier. After passing under a railway bridge, the next bridge [10] is Bankhall Steet, which takes you to Bankhall station [11]. Later on, after the canal takes a distinct turn to the right, the Irlam Road bridge [12] takes you to Bootle Oriel Road station [13]. |
Just past the Irlam Road bridge, you have to cross to the other side of the canal avoid a branch on the left; you cross back a little later. Next stop Litherland; when you see Litherland Moorings [15] on the other side of the canal, there is a road bridge ahead (Princess Way). Leave the canal to the left just before the bridge and head up Church Road to Bridge Road. In the 1950s, this was the main road, which crossed the canal by a lift bridge (long since gone) causing periodic traffic chaos. Go carefully around the roundabout taking the exit just before Princess Way. Seaforth and Litherland station is just down on the left. |

